升级
ES5.3.2升级6.8.5之后客户端大量反馈写入变慢
Elasticsearch • code4j 回复了问题 • 5 人关注 • 4 个回复 • 3256 次浏览 • 2021-04-18 10:13
ES6.8.10升级ES7.10.0
Elasticsearch • laoyang360 回复了问题 • 7 人关注 • 7 个回复 • 5795 次浏览 • 2021-02-09 12:20
es 版本升级后index是否需要升级
Elasticsearch • Charele 回复了问题 • 2 人关注 • 1 个回复 • 3955 次浏览 • 2020-02-21 14:23
如何平滑升级 ELK6.3.2升级到elastic stack 最新版本
Elasticsearch • zqc0512 回复了问题 • 3 人关注 • 2 个回复 • 3114 次浏览 • 2019-09-19 15:47
es 平滑升级,从1.7升级到5.5或6.x
Elasticsearch • fanmo3yuan 回复了问题 • 4 人关注 • 3 个回复 • 5067 次浏览 • 2019-01-12 10:55
es6.5.4 单节点扩展到集群问题
Elasticsearch • zqc0512 回复了问题 • 6 人关注 • 4 个回复 • 4677 次浏览 • 2019-01-11 09:17
Day 21 - ECE 版本升级扫雷实战
Elasticsearch • Ben_Wu 发表了文章 • 1 个评论 • 3921 次浏览 • 2018-12-21 10:50
Elasticsearch 6.2.2集群如何无损升级到6.3.0?
Elasticsearch • rochy 回复了问题 • 2 人关注 • 1 个回复 • 4058 次浏览 • 2018-09-21 10:07
现在用的es5.1.1的,也有5.5.1的,两个集群,两个版本,如何平滑升级
回复Elasticsearch • xiongge.club 发起了问题 • 1 人关注 • 0 个回复 • 3535 次浏览 • 2018-06-22 13:31
终于把2升到6了,分享一下
Elasticsearch • jinleileiking 发表了文章 • 0 个评论 • 2781 次浏览 • 2018-04-12 17:32
大规模数据es 1.x如何迁移升级到5.x
Elasticsearch • laoyang360 回复了问题 • 5 人关注 • 2 个回复 • 4390 次浏览 • 2018-02-11 19:47
elasticsearch5.2.1 rolloing upgrade到5.6.5遇到小坑
回复Elasticsearch • arterforyou 发起了问题 • 1 人关注 • 0 个回复 • 3638 次浏览 • 2018-01-12 12:27
请教问题,es在重新分配shard的时候,发生了什么?
回复Elasticsearch • luohuanfeng 发起了问题 • 2 人关注 • 0 个回复 • 4117 次浏览 • 2017-12-19 15:56
社区支持 Markdown 编辑器
默认分类 • medcl 发表了文章 • 4 个评论 • 5434 次浏览 • 2017-11-10 17:36
为了改善大家的创作体验,提高大家的写作和分享热情!?,经过两天的不懈奋斗,终于把 Markdown 编辑器搬上来了。 目前只支持文章的发布,可以通过切换编辑器来选择 Markdown 编辑模式。 希望不要再以编辑器作为理由发只有链接的文章了。 ???????????
- 支持 Github 风格的 Markdown 格式
- 支持本站附件功能
- 支持 emoj 符号
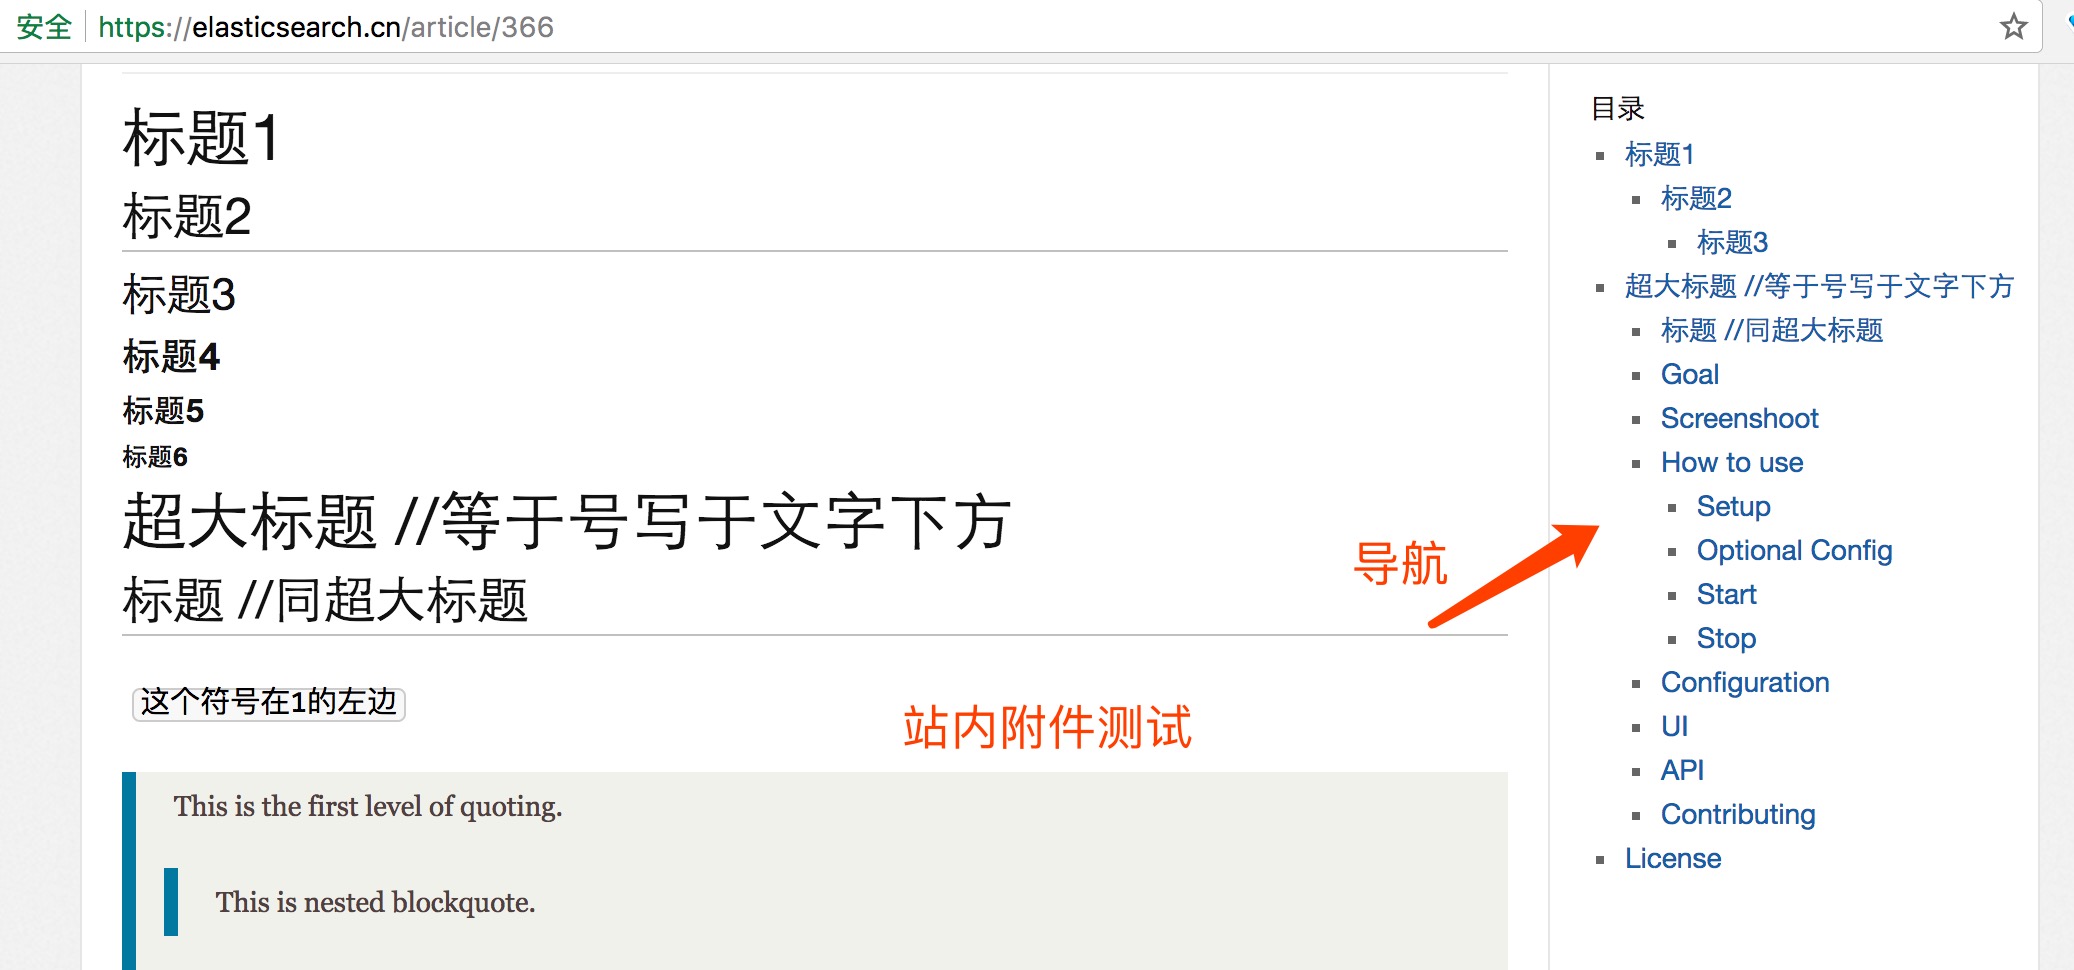
- 支持自动的页面导航
- 以前的文章可再次编辑,切换 Markdown 模式然后修改保存
如何使用?
- 点击【发起】,选择文章
- 切换绿色按钮,将编辑器切换到 Markdown,然后在文本框内输入 Markdown 格式的内容即可。
在线 Markdown 脚本编辑预览工具:https://elasticsearch.cn/static/js/editor/markdown/
以下为样式测试参考,忽略其意义。
----------- 常用格式-----------------
# 标题1
## 标题2
### 标题3
#### 标题4
##### 标题5
###### 标题6
超大标题 //等于号写于文字下方
===
标题 //同超大标题
---
`短代码`
_ 注:长代码块,用三个: ` _
> This is the first level of quoting.
>
> > This is nested blockquote.
>
> Back to the first level.
* Red
* Green
* Blue
- Red
- Green
- Blue
+ Red
+ Green
+ Blue
1. 这是第一个
1. 这是第二个
1. 这是第三个
* * *
***
*****
- - -
---
[markdown-syntax](http://daringfireball.net/projects/markdown/syntax)
[id]: http://example.com/ "Optional Title Here"
This is [an example][id] reference-style link.
*内容*
**内容**
_内容_
__内容__

<http://elastic.co/>
<info@elastic.o>
四个空格
一个tab
----------- 样式预览-----------------
标题1
标题2
标题3
标题4
标题5
标题6
超大标题 //等于号写于文字下方
标题 //同超大标题
短代码
This is the first level of quoting.
This is nested blockquote.
Back to the first level.
- Red
- Green
-
Blue
- Red
- Green
-
Blue
- Red
- Green
- Blue
- 这是第一个
- 这是第二个
- 这是第三个
This is an example reference-style link.
内容 内容 内容 内容

四个空格
一个tabhttps://github.com/infinitbyte/gopa 的 README 内容

GOPA, A Spider Written in Go.
Goal
- Light weight, low footprint, memory requirement should < 100MB
- Easy to deploy, no runtime or dependency required
- Easy to use, no programming or scripts ability needed, out of box features
Screenshoot

How to use
Setup
First of all, get it, two opinions: download the pre-built package or compile it yourself.
Download Pre Built Package
Go to Release or Snapshot page, download the right package for your platform.
Note: Darwin is for Mac
Compile The Package Manually
- Mac/Linux: Run
make buildto build the Gopa. - Windows: Checkout this wiki page - How to build GOPA on windows.
So far, we have:
gopa, the main program, a single binary.
config/, elasticsearch related scripts etc.
gopa.yml, main configuration for gopa.
Optional Config
By default, Gopa works well except indexing, if you want to use elasticsearch as indexing, follow these steps:
- Create a index in elasticsearch with script
config/gopa-index-mapping.shExample
curl -XPUT "http://localhost:9200/gopa-index" -H 'Content-Type: application/json' -d'
{
"mappings": {
"doc": {
  "properties": {
    "host": {
        "type": "keyword",
        "ignore_above": 256
    },
    "snapshot": {
      "properties": {
        "bold": {
          "type": "text"
        },
        "url": {
          "type": "keyword",
          "ignore_above": 256
        },
        "content_type": {
          "type": "keyword",
          "ignore_above": 256
        },
        "file": {
          "type": "keyword",
          "ignore_above": 256
        },
        "h1": {
          "type": "text"
        },
        "h2": {
          "type": "text"
        },
        "h3": {
          "type": "text"
        },
        "h4": {
          "type": "text"
        },
        "hash": {
          "type": "keyword",
          "ignore_above": 256
        },
        "id": {
          "type": "keyword",
          "ignore_above": 256
        },
        "images": {
          "properties": {
            "external": {
              "properties": {
                "label": {
                  "type": "text"
                },
                "url": {
                  "type": "keyword",
                  "ignore_above": 256
                }
              }
            },
            "internal": {
              "properties": {
                "label": {
                  "type": "text"
                },
                "url": {
                  "type": "keyword",
                  "ignore_above": 256
                }
              }
            }
          }
        },
        "italic": {
          "type": "text"
        },
        "links": {
          "properties": {
            "external": {
              "properties": {
                "label": {
                  "type": "text"
                },
                "url": {
                  "type": "keyword",
                  "ignore_above": 256
                }
              }
            },
            "internal": {
              "properties": {
                "label": {
                  "type": "text"
                },
                "url": {
                  "type": "keyword",
                  "ignore_above": 256
                }
              }
            }
          }
        },
        "path": {
          "type": "keyword",
          "ignore_above": 256
        },
        "sim_hash": {
          "type": "keyword",
          "ignore_above": 256
        },
        "lang": {
          "type": "keyword",
          "ignore_above": 256
        },
        "size": {
          "type": "long"
        },
        "text": {
          "type": "text"
        },
        "title": {
          "type": "text",
          "fields": {
            "keyword": {
              "type": "keyword"
            }
          }
        },
        "version": {
          "type": "long"
        }
      }
    },
    "task": {
      "properties": {
        "breadth": {
          "type": "long"
        },
        "created": {
          "type": "date"
        },
        "depth": {
          "type": "long"
        },
        "id": {
          "type": "keyword",
          "ignore_above": 256
        },
        "original_url": {
          "type": "keyword",
          "ignore_above": 256
        },
        "reference_url": {
          "type": "keyword",
          "ignore_above": 256
        },
        "schema": {
          "type": "keyword",
          "ignore_above": 256
        },
        "status": {
          "type": "integer"
        },
        "updated": {
          "type": "date"
        },
        "url": {
          "type": "keyword",
          "ignore_above": 256
        }
      }
    }
  }
}
}
}'
Note: Elasticsearch version should > v5.0
- Enable index module in
gopa.yml, update the elasticsearch's setting:- module: index enabled: true ui: enabled: true elasticsearch: endpoint: http://dev:9200 index_prefix: gopa- username: elastic password: changeme
Start
Gopa doesn't require any dependencies, simply run ./gopa to start the program.
Gopa can be run as daemon(Note: Only available on Linux and Mac):
Example
➜  gopa git:(master) ✗ ./bin/gopa --daemon
  ________ ________ __________  _____
 /  _____/ \_____  \\______   \/  _  \
/   \  ___  /   |   \|     ___/  /_\  \
\    \_\  \/    |    \    |  /    |    \
 \______  /\_______  /____|  \____|__  /
        \/         \/                \/
[gopa] 0.10.0_SNAPSHOT
///last commit: 99616a2, Fri Oct 20 14:04:54 2017 +0200, medcl, update version to 0.10.0 ///

[10-21 16:01:09] [INF] [instance.go:23] workspace: data/gopa/nodes/0
[gopa] started.
Also run ./gopa -h to get the full list of command line options.
Example
➜  gopa git:(master) ✗ ./bin/gopa -h
  ________ ________ __________  _____
 /  _____/ \_____  \\______   \/  _  \
/   \  ___  /   |   \|     ___/  /_\  \
\    \_\  \/    |    \    |  /    |    \
 \______  /\_______  /____|  \____|__  /
        \/         \/                \/
[gopa] 0.10.0_SNAPSHOT
///last commit: 99616a2, Fri Oct 20 14:04:54 2017 +0200, medcl, update version to 0.10.0 ///

Usage of ./bin/gopa:
  -config string
        the location of config file (default "gopa.yml")
  -cpuprofile string
        write cpu profile to this file
  -daemon
        run in background as daemon
  -debug
        run in debug mode, wi
  -log string
        the log level,options:trace,debug,info,warn,error (default "info")
  -log_path string
        the log path (default "log")
  -memprofile string
        write memory profile to this file
  -pidfile string
        pidfile path (only for daemon)
  -pprof string
        enable and setup pprof/expvar service, eg: localhost:6060 , the endpoint will be: http://localhost:6060/debug/pprof/ and http://localhost:6060/debug/vars
Stop
It's safety to press ctrl+c stop the current running Gopa, Gopa will handle the rest,saving the checkpoint,
you may restore the job later,the world is still in your hand.
If you are running Gopa as daemon, you may stop it like this:
kill -QUIT `pgrep gopa`Configuration
UI
- Search Console
http://127.0.0.1:9001/ - Admin Console
http://127.0.0.1:9001/admin/
API
- TBD
Contributing
You are sincerely and warmly welcomed to play with this project, from UI style to core features, or just a piece of document, welcome! let's make it better.
License
Released under the Apache License, Version 2.0 .
Also XSS Test
alert('XSS test');
ES5.3.2升级6.8.5之后客户端大量反馈写入变慢
回复Elasticsearch • code4j 回复了问题 • 5 人关注 • 4 个回复 • 3256 次浏览 • 2021-04-18 10:13
ES6.8.10升级ES7.10.0
回复Elasticsearch • laoyang360 回复了问题 • 7 人关注 • 7 个回复 • 5795 次浏览 • 2021-02-09 12:20
如何平滑升级 ELK6.3.2升级到elastic stack 最新版本
回复Elasticsearch • zqc0512 回复了问题 • 3 人关注 • 2 个回复 • 3114 次浏览 • 2019-09-19 15:47
es 平滑升级,从1.7升级到5.5或6.x
回复Elasticsearch • fanmo3yuan 回复了问题 • 4 人关注 • 3 个回复 • 5067 次浏览 • 2019-01-12 10:55
Elasticsearch 6.2.2集群如何无损升级到6.3.0?
回复Elasticsearch • rochy 回复了问题 • 2 人关注 • 1 个回复 • 4058 次浏览 • 2018-09-21 10:07
现在用的es5.1.1的,也有5.5.1的,两个集群,两个版本,如何平滑升级
回复Elasticsearch • xiongge.club 发起了问题 • 1 人关注 • 0 个回复 • 3535 次浏览 • 2018-06-22 13:31
大规模数据es 1.x如何迁移升级到5.x
回复Elasticsearch • laoyang360 回复了问题 • 5 人关注 • 2 个回复 • 4390 次浏览 • 2018-02-11 19:47
elasticsearch5.2.1 rolloing upgrade到5.6.5遇到小坑
回复Elasticsearch • arterforyou 发起了问题 • 1 人关注 • 0 个回复 • 3638 次浏览 • 2018-01-12 12:27
请教问题,es在重新分配shard的时候,发生了什么?
回复Elasticsearch • luohuanfeng 发起了问题 • 2 人关注 • 0 个回复 • 4117 次浏览 • 2017-12-19 15:56
elasticsearch 1.x到2.x版本的升级,出现冲突问题
回复Elasticsearch • fishman 发起了问题 • 1 人关注 • 0 个回复 • 5927 次浏览 • 2016-09-10 16:37
我现在是1.2.1,想升级到1.4版本
回复Elasticsearch • xcw931924821 回复了问题 • 4 人关注 • 3 个回复 • 8394 次浏览 • 2015-04-06 17:07
Day 21 - ECE 版本升级扫雷实战
Elasticsearch • Ben_Wu 发表了文章 • 1 个评论 • 3921 次浏览 • 2018-12-21 10:50
终于把2升到6了,分享一下
Elasticsearch • jinleileiking 发表了文章 • 0 个评论 • 2781 次浏览 • 2018-04-12 17:32
社区支持 Markdown 编辑器
默认分类 • medcl 发表了文章 • 4 个评论 • 5434 次浏览 • 2017-11-10 17:36
为了改善大家的创作体验,提高大家的写作和分享热情!?,经过两天的不懈奋斗,终于把 Markdown 编辑器搬上来了。 目前只支持文章的发布,可以通过切换编辑器来选择 Markdown 编辑模式。 希望不要再以编辑器作为理由发只有链接的文章了。 ???????????
- 支持 Github 风格的 Markdown 格式
- 支持本站附件功能
- 支持 emoj 符号
- 支持自动的页面导航
- 以前的文章可再次编辑,切换 Markdown 模式然后修改保存
如何使用?
- 点击【发起】,选择文章
- 切换绿色按钮,将编辑器切换到 Markdown,然后在文本框内输入 Markdown 格式的内容即可。
在线 Markdown 脚本编辑预览工具:https://elasticsearch.cn/static/js/editor/markdown/
以下为样式测试参考,忽略其意义。
----------- 常用格式-----------------
# 标题1
## 标题2
### 标题3
#### 标题4
##### 标题5
###### 标题6
超大标题 //等于号写于文字下方
===
标题 //同超大标题
---
`短代码`
_ 注:长代码块,用三个: ` _
> This is the first level of quoting.
>
> > This is nested blockquote.
>
> Back to the first level.
* Red
* Green
* Blue
- Red
- Green
- Blue
+ Red
+ Green
+ Blue
1. 这是第一个
1. 这是第二个
1. 这是第三个
* * *
***
*****
- - -
---
[markdown-syntax](http://daringfireball.net/projects/markdown/syntax)
[id]: http://example.com/ "Optional Title Here"
This is [an example][id] reference-style link.
*内容*
**内容**
_内容_
__内容__

<http://elastic.co/>
<info@elastic.o>
四个空格
一个tab
----------- 样式预览-----------------
标题1
标题2
标题3
标题4
标题5
标题6
超大标题 //等于号写于文字下方
标题 //同超大标题
短代码
This is the first level of quoting.
This is nested blockquote.
Back to the first level.
- Red
- Green
-
Blue
- Red
- Green
-
Blue
- Red
- Green
- Blue
- 这是第一个
- 这是第二个
- 这是第三个
This is an example reference-style link.
内容 内容 内容 内容

四个空格
一个tabhttps://github.com/infinitbyte/gopa 的 README 内容

GOPA, A Spider Written in Go.
Goal
- Light weight, low footprint, memory requirement should < 100MB
- Easy to deploy, no runtime or dependency required
- Easy to use, no programming or scripts ability needed, out of box features
Screenshoot

How to use
Setup
First of all, get it, two opinions: download the pre-built package or compile it yourself.
Download Pre Built Package
Go to Release or Snapshot page, download the right package for your platform.
Note: Darwin is for Mac
Compile The Package Manually
- Mac/Linux: Run
make buildto build the Gopa. - Windows: Checkout this wiki page - How to build GOPA on windows.
So far, we have:
gopa, the main program, a single binary.
config/, elasticsearch related scripts etc.
gopa.yml, main configuration for gopa.
Optional Config
By default, Gopa works well except indexing, if you want to use elasticsearch as indexing, follow these steps:
- Create a index in elasticsearch with script
config/gopa-index-mapping.shExample
curl -XPUT "http://localhost:9200/gopa-index" -H 'Content-Type: application/json' -d'
{
"mappings": {
"doc": {
  "properties": {
    "host": {
        "type": "keyword",
        "ignore_above": 256
    },
    "snapshot": {
      "properties": {
        "bold": {
          "type": "text"
        },
        "url": {
          "type": "keyword",
          "ignore_above": 256
        },
        "content_type": {
          "type": "keyword",
          "ignore_above": 256
        },
        "file": {
          "type": "keyword",
          "ignore_above": 256
        },
        "h1": {
          "type": "text"
        },
        "h2": {
          "type": "text"
        },
        "h3": {
          "type": "text"
        },
        "h4": {
          "type": "text"
        },
        "hash": {
          "type": "keyword",
          "ignore_above": 256
        },
        "id": {
          "type": "keyword",
          "ignore_above": 256
        },
        "images": {
          "properties": {
            "external": {
              "properties": {
                "label": {
                  "type": "text"
                },
                "url": {
                  "type": "keyword",
                  "ignore_above": 256
                }
              }
            },
            "internal": {
              "properties": {
                "label": {
                  "type": "text"
                },
                "url": {
                  "type": "keyword",
                  "ignore_above": 256
                }
              }
            }
          }
        },
        "italic": {
          "type": "text"
        },
        "links": {
          "properties": {
            "external": {
              "properties": {
                "label": {
                  "type": "text"
                },
                "url": {
                  "type": "keyword",
                  "ignore_above": 256
                }
              }
            },
            "internal": {
              "properties": {
                "label": {
                  "type": "text"
                },
                "url": {
                  "type": "keyword",
                  "ignore_above": 256
                }
              }
            }
          }
        },
        "path": {
          "type": "keyword",
          "ignore_above": 256
        },
        "sim_hash": {
          "type": "keyword",
          "ignore_above": 256
        },
        "lang": {
          "type": "keyword",
          "ignore_above": 256
        },
        "size": {
          "type": "long"
        },
        "text": {
          "type": "text"
        },
        "title": {
          "type": "text",
          "fields": {
            "keyword": {
              "type": "keyword"
            }
          }
        },
        "version": {
          "type": "long"
        }
      }
    },
    "task": {
      "properties": {
        "breadth": {
          "type": "long"
        },
        "created": {
          "type": "date"
        },
        "depth": {
          "type": "long"
        },
        "id": {
          "type": "keyword",
          "ignore_above": 256
        },
        "original_url": {
          "type": "keyword",
          "ignore_above": 256
        },
        "reference_url": {
          "type": "keyword",
          "ignore_above": 256
        },
        "schema": {
          "type": "keyword",
          "ignore_above": 256
        },
        "status": {
          "type": "integer"
        },
        "updated": {
          "type": "date"
        },
        "url": {
          "type": "keyword",
          "ignore_above": 256
        }
      }
    }
  }
}
}
}'
Note: Elasticsearch version should > v5.0
- Enable index module in
gopa.yml, update the elasticsearch's setting:- module: index enabled: true ui: enabled: true elasticsearch: endpoint: http://dev:9200 index_prefix: gopa- username: elastic password: changeme
Start
Gopa doesn't require any dependencies, simply run ./gopa to start the program.
Gopa can be run as daemon(Note: Only available on Linux and Mac):
Example
➜  gopa git:(master) ✗ ./bin/gopa --daemon
  ________ ________ __________  _____
 /  _____/ \_____  \\______   \/  _  \
/   \  ___  /   |   \|     ___/  /_\  \
\    \_\  \/    |    \    |  /    |    \
 \______  /\_______  /____|  \____|__  /
        \/         \/                \/
[gopa] 0.10.0_SNAPSHOT
///last commit: 99616a2, Fri Oct 20 14:04:54 2017 +0200, medcl, update version to 0.10.0 ///

[10-21 16:01:09] [INF] [instance.go:23] workspace: data/gopa/nodes/0
[gopa] started.
Also run ./gopa -h to get the full list of command line options.
Example
➜  gopa git:(master) ✗ ./bin/gopa -h
  ________ ________ __________  _____
 /  _____/ \_____  \\______   \/  _  \
/   \  ___  /   |   \|     ___/  /_\  \
\    \_\  \/    |    \    |  /    |    \
 \______  /\_______  /____|  \____|__  /
        \/         \/                \/
[gopa] 0.10.0_SNAPSHOT
///last commit: 99616a2, Fri Oct 20 14:04:54 2017 +0200, medcl, update version to 0.10.0 ///

Usage of ./bin/gopa:
  -config string
        the location of config file (default "gopa.yml")
  -cpuprofile string
        write cpu profile to this file
  -daemon
        run in background as daemon
  -debug
        run in debug mode, wi
  -log string
        the log level,options:trace,debug,info,warn,error (default "info")
  -log_path string
        the log path (default "log")
  -memprofile string
        write memory profile to this file
  -pidfile string
        pidfile path (only for daemon)
  -pprof string
        enable and setup pprof/expvar service, eg: localhost:6060 , the endpoint will be: http://localhost:6060/debug/pprof/ and http://localhost:6060/debug/vars
Stop
It's safety to press ctrl+c stop the current running Gopa, Gopa will handle the rest,saving the checkpoint,
you may restore the job later,the world is still in your hand.
If you are running Gopa as daemon, you may stop it like this:
kill -QUIT `pgrep gopa`Configuration
UI
- Search Console
http://127.0.0.1:9001/ - Admin Console
http://127.0.0.1:9001/admin/
API
- TBD
Contributing
You are sincerely and warmly welcomed to play with this project, from UI style to core features, or just a piece of document, welcome! let's make it better.
License
Released under the Apache License, Version 2.0 .
Also XSS Test
alert('XSS test');


